Getting Started #5 - Research

Research is just as important as the officers on the ships, as research enhances the capability of the players in many ways.

It is important to complete as much research as possible before upgrading your Operations Center, otherwise you will be too weak to complete tasks or play against other players at the new higher level.

Combat: Ship Capability and ship Blueprints
Station: Base components and abilities
Galaxy: General enhancements of ships and mining
Outlaw: Research for the Stella ship, and things related to the Outlaws
Territory: General enhancements for ships and mining Isogen

Getting Started #4 - Moving Base for Better Mining

Base Relocation Tokens can be collected, and used to relocate your base to another system that has the resources you want to mine. Look for a HUB planet as indicated by the icon, tap on the planet and hit Relocate Base. You need to have your ships either in the system you are relocating to, or docked at your base (fully repaired).
As you explore other systems, you will notice that some systems have bigger mining nodes than others. By using the bigger mining nodes, you can collect more material before the node needs to be reset (moving off node, and back onto it). Players can reduce their travel time to systems and improve mining efficiency by moving to systems with the material that is needed. For those in lower levels (below 18), here are good systems that contain 2* material and their node sizes:

SystemLVLMaterialMax Node SizeHub Planet
Azha20Crystal35000Yes
Astrida14Crystal25000Yes
Lycia14Crystal25000Yes
Amadore19Crystal25000No
Bellas12Crystal5500Yes
Nelve12Crystal5500Yes
Fastoff21Crystal/Ore45000No
Opla20Gas35000Yes
Vindemiatrix15Gas25000Yes
Midnight19Gas25000No
City Laga15Gas15000Yes
Elona13Gas5500Yes
Zaurak13Gas5500Yes
Sorenle21Gas/Ore45000No
Labac17Ore25000Yes
Kepler20Ore25000Yes
Deneva15Ore25000Yes
Obilent17Ore25000Yes
Dhi’ban14Ore5500Yes

When moving to a new location, there is a certain order to where stations will be placed around a planet.
Be mindful if an enemy is nearby.


Getting Started #3 - Missions

STFC has another component to get resources, and that is Missions. Missions are accepted by visiting systems and tapping on the planet while having a ship nearby. Missions have objectives inside them, and always a story line.

Mission objectives:
Travel to a location
Destroy a target
Donate material
Complete a build/research
Recall ship to Base


When new content is released into STFC, it typically starts with a mission of some kind which starts the story. Players will not be able to access new content without collecting the rewards from the missions, making missions in STFC that much more important.

Getting Started #2 - Beginner Milestones

The player level is advanced by research and building the correct buildings to allow the Operations Center to be upgraded. Leveling up also gives access to different ships and research abilities. Here are the notable milestones for various ships.

Level 1:
Realta (1* Common Explorer)

Level 5: Orion Corvette (1* Common Battleship)
Level 7:
Fortunate (1* Comon Mining Ship)

Level 9:
Astronautics (Research Efficiency)

Level 10:
Refinery
Player vs Player (Ships only)

Level 12:
Turas (2* Comon Explorer)
Envoy (2* Common Mining Ship)
Jellyfish (2* Rare Explorer)

Level 14:
Talla (2* Common Battleship)

Level 15:
Player vs Player (Base Hits)

Level 17:
Franklin (3* Common Explorer - Swarm)

Level 18:
North Star (3* Rare Mining Ship) Ship Hanger (Ship count, Hull Health)
Level 20:
Kehra (2* Common Interceptor) Scrapyard

Level 22:
Vahklas (3* Common Explorer)

Level 23:
D'Vor (Latinum Mining Ship)
Armada Control Center (Launch Armadas)
Engine Technology Lab (Dodge, Interceptor Shield)
Foundry (Armor, Battleship Shield)
Science Lab (Shield Deflection, Explorer Shield)

Level 24:
Kumari (3* Common Battleship)

Below is a chart from LCARS showing the various building requirements by level:


Getting Started #1 - Basic Game Mechanics

This game operates similar to Dungeons and Dragons, in that the ships you use have abilities based on ship type, and how it has been upgraded. Ships can be improved by putting on better officers.
Each ship has bonuses that are affected by the officer stats on the ship. Those stats get added together, and can improve key parts of the ship stats (Attack, Defense, Health). In addition to this, there are three main types of ships (Explorer, Interceptor, Battleship). Each one has certain abilities that gives them an advantage/disadvantage over other ship types.

Each officer has a Captains Ability, that only activates when they are in the middle position on the bridge (captains chair). The Officer Ability is active only while on the bridge. As officers are promoted, the Officer Abilities are improved as well as the officer stats, both of which make ships more powerful.

Research is also a component of the ship power. Lower level research pads the ship stats directly, while higher level research will add percentages to the ship stats. Officers can also add to ship stats to make it powerful in different ways.

Leveling up ships improves the ability of the ship as well. So look at the ship ability and understand that as the ship levels up, that ability gets better. Ship ability will help quite a bit on mining ships.

Once you understand this game mechanic, you can make better choices as to how you play to maximize your results (picking the right ship, and use the proper crews).
When picking a ship to destroy (Hostile or Player), look at the battle triangle types to get an advantage as well as looking at the ship strength. 

Territory Takeover Maps

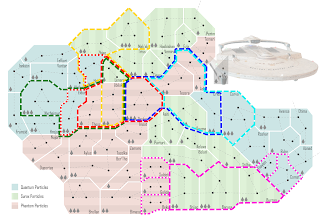
This is a map to help with planning of takeovers in Origin Space.
***Updated Oct 2023***
 
***These Maps/Schedules do not account for the summertime daylight savings.***
-1 hour for Summer Time scheduling


Full Map

Times Only

*Remember: Small ships for spamming systems cannot reach territory zones unless launched from a base inside Origin space. 


Below is a map showing the areas than can be controlled that will:
1. Have a T3 Space
2. Have access to all Particles (Phantom, Quantum, Surax, Metreon)

 (Smaller dotted line indicates options - Red / Purple)
(Alliance must be LVL20 or higher to control 5 spaces)


Below is a map showing zones that are needed to get just the main 3 particles for research, and no T3 zone. (Smaller dotted line indicates options - Yellow)


Below is a blank maps that can be used for planning purposes within alliances. Added by request.

***These Maps/Schedules do not account for the summertime daylight savings.***
-1 hour for Summer Time scheduling

For a schedule of the territory zones, check out the images below separated by days of the week. This is for the American servers. Full PDF of the schedule can be found here

Sunday


Monday


Wednesday


Thursday


Friday


Saturday


iCal Reminder (Click name for iCal Download)
These are designed to remind alliance members 15 minutes ahead of a takeover, to improve participation.

These will compensate for time zone differences and repeat weekly by default.
Sun Mon
(2*)
Wed Thus
(2*)
Fri Sat
(3*)
Aonad Abilakk Adia Anzat Beku Barasa
Aylus Bimasa Asiti Avansa Comst Brellan
Gelida Bolari Lenara Ber'Tho Ezla Corva
Helvi Crios Otima Brijac Framtid Mak'ala
Innlasn Duportas Perim Burran Klefaski Nyrheimur
Parturi Eldur Tefkari Hrojost Kolava Tholus
Qeyma Hoobishan Thaylen Nujord Ruhe
Stilhe Roshar Thosz Tezera Saldeti
Temeri Zhian Zamaro Triss Tazolka
Vemira
Vantar Tigan

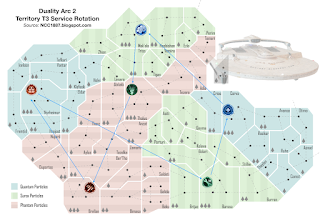
T3 Services were rotated during Duality Arc 2 (Nov 2021). Here are the changes made at that time:

Below is a list of all of the services that the zones within Origin Space provides, as well as the materials cost that an alliance must gather each week to activate those services. For a PDF download of the charts, Click Here to Download


AonadAylusGelidaHelviParturiStilheTemeriVemiraAbilakkBimasaBolariCriosDuportasEldurHoobishanRosharZhianAdiaAsitiLenaraOtimaPerimTefkariThoszZamaroAylusAylus

Territories #8 - Sarcophagus Ship

This ship will work on capture nodes during a takeover. It doesn't need to be in a participating alliance for that takeover.

If you see this ship as an opponent during a takeover, take it out before it gets to a capture node. This ship is an Epic ship that is accessible by LVL30 players, and its ability to stack damage is only active when either attacking a capture node occupant, or defending a capture node. It is a slow ship otherwise with not much use.

The ability to upgrade the ship is linked to the Territory Store. Initially, it looks like it will cost $300 for early CC warriors to get this ship at launch. BPs are available from Solo Events and from the Battle Pass. This will be a game changer in territories, as it will level the playing field against big players. BPs are available in the Event Store as part of the Cosmic Cleanup, but at a rate of 4BPs per event.

Black Fleet Memorial is locked to LVL 34, so 33 and below is limited to Tier 2.
Rare Black Fleet Memorial is locked to LVL 37, so 36 and below is limited to Tier 6.

Kirk and Spock will not work on this ship, as there is NO SHIELD. The name of the game is to mitigate the damage from opponent, like Discovery Crew.

***Do not use this ship if you do not have the Bakanite to do the repair. If you are out of RSS to repair, it will tie up a dock, and the officers. You cannot use Latinum to bypass the repair. (Cool off for Bakanite is 22 hours). Do not leave a Sarcophagus in dock with base unshielded.

This ship is huge, and really slow (Impulse 80), and it takes just over 2 minutes to impulse across a system.

This will be updated as we get more information


Below is information on some testing with the Sarcophagus:

The Sarcophagus faired rather well against the Auger, considering the crew it was running and the strength difference. This does make it expensive for G4 ships to clear the nodes against a Sarcophagus when used properly. Your results may vary.

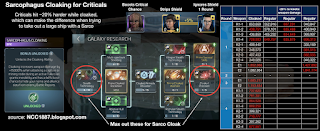
In December 2021, a Cloaking Device was made available for the Sarcophagus which is incredibly useful during a takeover, as the slow ship can make it to a capture node and hit the ships. While cloaked, a boost to the weapons also occurs which is most noticeable on criticals. This is perfect for Honor Guard Worf as he boosts the Critical Hit Chance for the first 8 rounds. 
Criticals hit ~20% harder while cloaked, which can make the difference when trying to take out a large ship with a Sarcophagus in STFC

Criticals while cloaked hit ~20% harder, so really big ships can also be taken out in multiple hits. In the example below, a 12M Valdore was taken out by a 3M Sarcophagus. Each attack took ~ 1/4 of its hull, proving that a sarco can be used to fight a large player parked on a node.
Cloaked Sarcophagus is incredibly useful to clear really strong ships, but takes the right crew and multiple hits. Use a cloaked ship to see inside system, then bring in Sarco to capture nodes.

The Sarcophagus is not technically part of the Klingon Faction, so the cloaking research for Klingon ships does not affect the Sarcophagus cloak duration but does the critical damage.

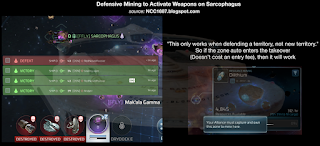
If defending a territory, a sarcophagus can be moved to a mining node and the weapons will activate on the node. This is also helpful if a player is out of Tetryons for cloaking, or not equipped with a cloak, and are unable to reach a capture node. Some mining nodes are close to the edge of the system, which is perfect for getting onto a node before being targeted and destroyed in route.
*This only works when defending a territory, not new territory.*
So if the zone auto enters the takeover 
(Doesn’t cost an entry fee), then it will work


Borg #11 - Assimilated Trade Ship Hunt

This is specific to a L29 Borg probe system, but illustrates how Hostile Spawn Points work, which other systems have different configurations, but same logic.

Hunting the trade ship can a a lot of luck, or you can make your own luck. Stay near the spawn points to reduce the time it will be in space for others to get when it does show up. Pick a spot between 2 spawn points, and don't wander too far. Nothing sucks more than seeing someone else get the trade ship before you. Our screens will only show us so much of the system, but understanding this can become the advantage. A landscape rectangle is the app view, making the Top Right and Bottom Right of Roda Gamma the best place to hunt for trade ships.


The chart below shows the stats of the Ferengi trade ships. Be sure you are strong enough to hunt them, or you will be wasting tokens


Officers #5: Below Deck Officers Driving Bridge Officer Abilities

Staffing a ship with the right crew helps to maximize a ships ability, but once the Bonus Stats are maxed out for the ship, points can still count towards Bridge Officer Special Abilities, like Morale, Hull Breach, or Burning. By stacking the points beyond the ship ability, this makes the ship stronger than the stats display.

The other not so obvious one is shield restoration based on Defense Stats when Moral is Active, which doesn't show on Ship Stats.


More on this topic: https://www.youtube.com/watch?v=lHX4T2AHnJg


Armada #1: Main Crews

Armadas bonus exceptions
Due to their size and power, Armada Targets are not affected by the following research bonuses and abilities:
• Research: Combat - Defensive Tactics
• B’Rel Class - Cloaking System
• Gladius Class - Secret Weapon
• Grace Chen - Energy Absorber
• T’Laan - Objective Defense
• Tal - Resistance
• Mara - Wife of a Dahar
• Qa’ug - Excel under Pressure
• Severus - Spreading Fire
• Yuki Sulu - Disrupting Field
• John Harrison - Sabotage
• Marlena Moreau - No Fear
• Cadet Nyota Uhura - Scan the Enemy
• Vixis - Fake Communiques
• D’joaki - Shatter Defenses
• Chang - Dogs of War

Use the Special Abilities to create conditions against the target that is shared with participants in the Armada (except Morale). This can help add more damage to the target, especially on larger targets.

Below is a more refined chart showing the armada target level and which ships should be used against them, as well as recommended crews to utilize for maximum effect.

By using the principal of "staying in your lane", players within an alliance can achieve more reward per player and a lower failure rate on armadas. 


Armada loot distribution among participants is based on ship strength brought to the fight, not damage done in battle. It is highly recommended to stick to the "Lanes" mentality within an alliance to maintain a fair distribution of loot to players. A lower level player can launch a really high level armada and still get good rewards as they get a chest each time as the one launching, but the battle chest will be small.


Gameplay-Strategy #9 - Nova

Watch for the Nova graphics on the Galaxy map, as it indicates the Top 3 systems by activity. This can indicate activity due to an event, base raid, or mass PvP battle.


Nova graphics on the Galaxy map can indicate a lot of activity in a system. Typically a Nova graphic will show for the Top 3 systems in the galaxy at the time. This system appears to be driven by the number of attacks (not damage) in a system.

Events can heavily drive the Nova graphic to move:
- Borg Probe event made all three LVL25 Borg systems go Nova
- A large base raid will also move the Nova graphic

Event #8 - Borg Officers (Alliance)

1. Gain Shards - this is through Ultra Recruit Tokens or the Key Tokens that can be purchased or part of Borg event rewards.
2. Promote Officers - self explanatory
3. Kill Borg Probes - you get 1 point for alliance event for each probe, regardless of strength. But if you use a BORG office as Captain, you get an additional 5 points for a total of 6. Now the best crew and system for Borg Probes is L29 (Pike, Moreau, TLaan), but you can grind lots of 25's with One of Ten as captain.

This is not the most efficient way to get probes, but to compete as an alliance, its recommended that each member use ONE transwarp coil each day and use One of Ten and farm some 25's to help the alliance. A more appropriate Borg officer when you get them will also work.

Event #7 - Crucible of War (Alliance)

Be sure to score points early, and often to max out the event with the alliance.

Event #6 - Faction Hunt (Alliance)

Faction Event - This is one of the easiest and best ways to gain personally and for the alliance. There is really no reason that every member cannot finish this event. Simply kill faction hostiles to get tons of officer XP, ultra recruit tokens, faction tokens. This event is sometimes used for an event to collect points towards the Battle Pass.

1. Kill faction hostiles - as low as Level 18, but be smart an kill in conjunction with your faction dailies!
2. Tier up Faction Ships - if you can, great, but don't overextend yourself if you don't have the resources, parts, etc.

Save your Officer XP collected in this event for future events like Domination.

Event #5 - Battle for Glory (Alliance)

Every member must complete their quota to win this event. If members go beyond thier quota, it doesn't do anything for the alliance.

Do not go after ships that are higher than the evnet requirnment unless you are combining event with daily goals.

Events #4 - Mega Mining (Alliance)

After this event, there is usually a Bonus Refinery that opens, making everybody scramble for their needed G3 material. Stockpiling between these events can help you maximize the Bonus if it becomes available.

Look around at different systems, as the higher level systems will have higher mining base rates on the nodes.

Events #3 - Domination (Alliance)

Pay attention to the length of the Alliance Leaderboard, as this event is typically a 2 day event, so you will need some RSS for the 2nd half of the event.

Event #2 - Latinum Mining (Alliance)

Latinum Monday’s have become a common occurrence, but there is a bit of strategy to hit the top rewards. Preloading RSS is a great start, but switching to 3* during the event is more efficient for non-D’Vor ships.

Solo Leaderboard brackets
- OPS 24-25 Milestone 700k
- OPS 26-27 Milestone 800k
- OPS 28–29 Milestone 1.2M
- OPS 30-31 Milestone 2.0M
- OPS 32-35 Milestone 2.0M
- OPS 36-39 Milestone 4.0M
- OPS 40–42 Milestone 4.5M
- OPS 43+ Milestone 4.5M
Points
- OPS 23 ONLY 145 per Lat
- Latinum = 5
- G4 = 25 22
- G3 = 15 13
- Stolen Latinum = 5
Alliance Milestone
- Points
- Latinum = 5
- G4 = 22
- G3 = 13
- Stolen Latinum = 5

Events #1 - Data Mining (Alliance)

Data Mining can be rather annoying for an event, because it takes a long time to reach the nodes even if base is close to Augment space. In addition, research makes data mining even faster, so you are hitting OPC sooner.

When competing in the Data Mining event, it is key to have a Botany Bay (BB) ship with maxed out ship XP because that affects the mining rates. Sometimes players will be willing to rotate a node with you instead of attacking. It is most beneficial if you can rotate your own node with a 2nd BB.

The leader boards are bracketed, so you will only see players within a few levels on the same board. Some other players didn't max Ship XP, others don't complete research. If you want to compete in this event, you will need to do both, and mine like crazy.

Borg #10 - Borg Armada Targets

Warning: Timers are 5 minutes, so ships must already be in area to participate.

Only use a ViDar with:
1. Nine of Ten as captain then two other Borg Officers - this will eliminate the Borg Cube critical bonus
2. Eight of Ten as captain / Nine of Ten and Gorkon - this will likely bring Hull Breach increasing all critical damage for the whole armada
3. Eight of Ten as captain then Nine of Ten and Seven of Ten or two Borg officers to increase the chances of critical hits

If you don't have Borg officers, use Kirk/Spock and Carol Marcus or Kahn or best officer.

Collect and redeem Borg Tech Salvage parts to get Armada Directives or TransWarp Cells (different from the Probe Space areas).

Alliance redemption of TransWarp Cells cost a bit more, but give cells to the rest of the alliance as well.


Borg #9 - Rare Borg Trade Ships

Watch for these ships while hunting regular Borg Probes, it could get you access to the secret latinum systems. These ships travel at about the same speed as probes, but have the mining symbol instead of the interceptor symbol. So watch for them.

Many alliances consider Borg Latinum systems sacred due to how difficult it is to get there, so leave other ships alone when there.


Borg #8 - Effective Probe Hunt Testing

Your results will vary based on the Tier/Level/Components of your Vi'Dar. These tests were done with the same components at LVL20, with the same crews, varying Chen/T'Laan as 2nd officer.

It seems the big differences are at LVL25, and LVL29 Probes in favor of T'Laan, otherwise use Chen.

If you have 7/8/9 borg officers, and your ViDar at least to tier 4, they may be more effective against L29 than a Pike/Moreau/T’Laan due to the probe firing pattern.

Popular Tips